Showing posts with label Handmade. Show all posts

Friday, October 14, 2011

Tutorial: Cowl Shirt

Hi, friend!

By now, I'm sure you've heard of Pinterest, the most amazing website ever. It's essentially a digital bulletin board, where you can pin pictures of all your favorite things and still retain the original source link. The only down side is the obvious black hole for time it can become as you sift through all the beautiful eye candy.

While perusing the site, I came across this adorable outfit:

Lucky for me, I already own jeans, brown boots, AND a green knit pea coat. What I really had my eye on was that adorable striped cowl. Lucky for me, I also had some striped knit...


AND a handy workhorse tee pattern from an existing shirt, so I made myself one! 

What do you think? (Photos come courtesy of Squirrel, who is quite the gifted iPod photographer...I feel like I walked right off a magazine shoot!) 


(Well...a magazine shoot where the models never lost that 40lbs of baby weight from #2
...and then slouches...
while wearing horizontal stripes...) 


Want one of your own? (The shirt, not the leftover baby belly!)
 Lucky you! 
I'll show you how! 

First things first: cut your pieces out from your tee pattern.
For this shirt, I knew I only wanted a half sleeve, so I simply folded my shirt sleeve pattern under itself.

Then, right sides together, sew together the shoulder seams on your front and back pieces. 


Now, take a sleeve, and by folding it half, find the middle. 
(You can see below that I placed a pin there to mark it.) 


Putting right sides together, line up the center of the sleeve with the shoulder seam. 


Pin the shoulder of the sleeve to the curve of the front and back pieces. 


Sew the seam you pinned, and then repeat for the other sleeve. 
Now you are starting to have the shape of a shirt! 


Next, start at the underarm seams of your shirt so the front and back line up. 
Pin them and sew from the end of the sleeve to the bottom of the shirt. 
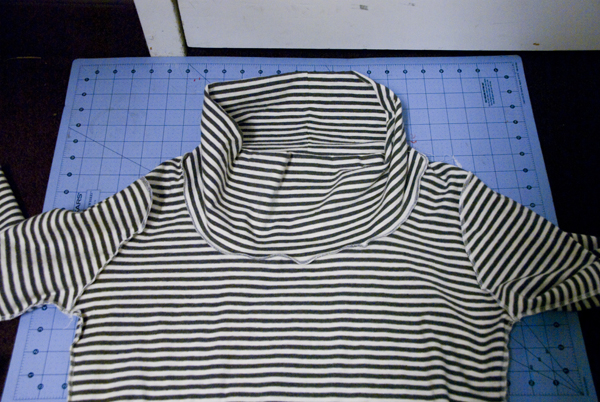
At this point, if you don't want a cowl, you can hem the sleeves, neckline, and bottom of the shirt and call it quits. However, we are going for something even better! 
In order to have a good loose cowl (and not a turtleneck), make sure that you have a wide and deep scoop-neck to your tee. If it isn't wide enough, take some scissors and trim out the neckline. 

Once your shirt has a wide enough neck, use a tape measure to measure all the way around the neckline. 
This one measured 33 inches. 


Now, to cut the cowl: 
Using the measurement you took around the neckline, cut a piece of fabric that is that length and very wide. 
I cut a piece 33 inches long and 12 inches wide. 
Here it is, folded in half "hot dog style."


Now, unfold the piece and re-fold it, "hamburger style."


Sew the two raw edges together so you have a loop of fabric. 


Now fold the loop "hot dog style" again. 


Tuck the loop, open edges up and align the seam in your loop to the back of the shirt or the shoulder seam. Pin the paw edges and the neckline of the shirt together all the way around, and then sew together. 


All you have left to do is hem the sleeves and bottom of the shirt!
(And have a private photo shoot with the world's MOST adorable photographer.) 

A cool new cowl to keep you just right for fall! 

Enjoy! 

(Here's one more of my little artist--she's diverse and enjoys modeling as well!)


Photobucket

Tuesday, October 11, 2011

Tutorial: Shirt Pattern from Existing Tee

Hey y'all! 
I have a couple of tutorials ready for you, but have had a hard time getting them up here. Of course, life is always busy, but lately, blogger and my internet are not getting along. C'est la vie. Hopefully, you enjoy these as I can roll them out. 

I have been working on a couple of clothing items for myself. (I always get a hankering for new clothes at the start of Spring and Fall...must be the change in weather! And when you can't afford to shop--sew!) And I thought while I was at it, I'd draw up some tutorials. 

But first, what we need is a good workhorse shirt pattern--basically, a pattern that fits well, is basic, and easily adjustable. So this tutorial focuses only an creating that pattern, a very simple process that translates easily to most basic clothing articles. 

You will need: 
a t-shirt that fits well (long-sleeved if you have one--easier to shorten sleeves than make them)
butcher paper or freezer paper (found in many grocery stores) or even newspaper
marker
straight pins

Freezer paper is great because it is very durable and relatively inexpensive. 

First, you will fold your shirt in half and lay it on top of the freezer paper. You can do this with the sleeve out, but I prefer to just tuck it under. 

Then, using a marker, trace the outline, keeping a couple of things in mind:  
*Make sure to give yourself a bit of room for a seam allowance. 
*If you are working from a t-shirt that is very thin, add a little extra width because thicker fabrics will not stretch as well. 
*Remember to add more at the bottom for a hem! 
(If you are uncomfortable with a marker this close to your favorite t-shirt, you can use the pin prick method mentioned below!) 


You can see in the photo above that I added quite a bit of length to this shirt. 
Partly, this is because this shirt hits me just above where I'd like it to, 
and partly because I knew what I was making would be a bit longer. 


Repeat the tracing with the other side. When you are done, you should have a front and a back piece. (The front should be cut lower than the back). Label the side that you will need the fold to be on, and label each piece as "Front" or "Back."
Here's my two pieces, front and back. (Sorry for the lack of contrast--I'm a night crafter!) 

Next, we are on to the sleeve. Much like the bodice, you will lay the sleeve out flat. 

Now, as you can see, you can't just use a marker to trace the inner seam of the sleeve, so one way to do this is by using straight pins. 

Simply use your straight pin to poke through the freezer paper along the seam, as demonstrated with the yellow dots in the next photo. 

Then, remove the sleeve, and connect the dots with a gently curving line...


And you'll have a whole sleeve and a finished pattern! 


These are the three basic pieces for a shirt pattern, and there are only a few seams before your shirt is completed!

More tomorrow on the first project (so long as blogger cooperates).

See you then!

Photobucket

Monday, October 3, 2011

Tutorial: Fleece Ear Warmer Headband

As I mentioned a few days ago, I started running back in April. The spring and summer months in Idaho are great for running. But as fall's chill has begun to creep in, I have realized I need some new gear to run in. The other night, I realized the first thing to get cold (and NOT warm up once I got going) was my ears! So I decided to make a fleece head band to keep them warm. And while I was at it, I made a tutorial.

I have a penchant for leopard print, so lucky for me, I had some leopard print fleece already on hand. The piece was pretty small, a leftover from Little Bird's awesome Halloween costume from last year. But, the piece doesn't need to be very large.


With my cutting mat, rotary cutter, and quilting square, I cut two layers of fabric about 4 1/2 inches wide by 24 inches long. (If I were to do this again, I would probably have thinned it just a bit.)


Then, I wrapped the strips around my head to fit and ended up cutting about 2 inches off. 
Next, taper the ends so it will stay put on the back of your head a little better. 


Once you have it tapered the right amount, go ahead and sew the pieces together all the way around, leaving a small opening to turn the headband. 


I left my opening at the end, but you can leave it anywhere. Just make sure you have enough space to turn the headband right-side-out through the hole. 


Once you have turned it right-side-out, use a straight stitch to top-stitch the headband. 


Next, using a tight zog-zag stitch or your machine's button hole maker, create a button hole. 
(This was my first ever button hole! Not too shabby, if I do say so myself.)
After you have made the button hole, cut the space in the middle of the stitch. 


Now, for a bit of embellishment. I just randomly cut out a few flower shapes to layer, and an irregular strip for added texture. 


I layered the flowers on top, and ruffled the strip. 
Using thread and needle, apply the embellishments and the button on the 
opposite tail from the button hole. 

Aaannnddd...
You're done! And if you have longer hair than me (so not hard), 
you probably won't look as crazy, like you put your finger in a light socket. 

Here's the thing about making stuff for yourself...
then you have to be the model. 
I don't post a lot of photos of myself because I think they're cheesy...and well, never look right...


Do I smile?

Act too cool for school?

Something in between?


Give up and make ridiculous faces like this?


Or go back to the beginning and hide like usual? 
(I think this is the one I like best. )


Anyway, enjoy your headband! I've already tested it out and it does indeed keep my ears cozy and warm! Now I may be able to run outside all winter long...


Photobucket

Thursday, August 25, 2011

We are going to....

DISNEYLAND!!!!

I am so EXCITED. The one thing I really miss about our "new life" is Disneyland. I probably whine to Rob about it way more often than is acceptable. But I think people are either Disney people or not--and for me, I am definitely a Disney person.

Well, apparently, my amazing husband got the idea in his head to ferret money away for a surprise trip and plan it with my brother-in-law as a surprise for my sister. It didn't stay a surprise for her very long, and my parents decided to go as well. As a result, the surprise was almost blown a couple of times, but they managed to cover their tracks. And for our anniversary, Rob told me we'd be leaving at the end of this month for Disney!

At first, he got a "that's not funny to joke about" response. But once I realized he wasn't kidding, now he has a wife who is out of control making adorable stuff for us to wear while we are there!

I am so STOKED that we are going and that both my babies will be old enough to remember this trip (and tall enough to ride the Matterhorn!). There is something just MAGICAL about Disneyland--I become emotional at the thought of seeing my kids faces light up in wonder at that place--the magic, the smiles, the wonder, the excitement. Yeah, I am definitely a Disney person!


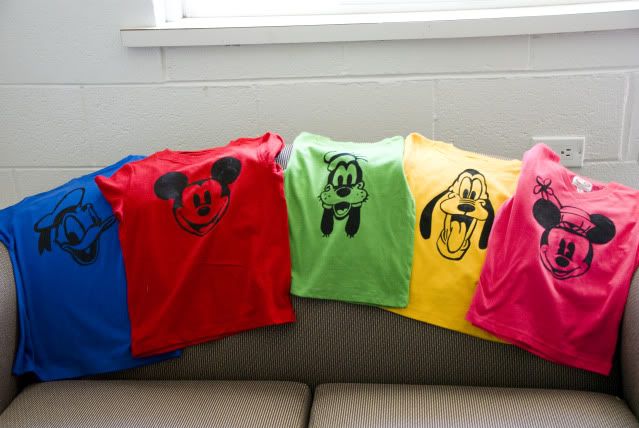
Here's the first thing I made: freezer paper stenciled shirts for Squirrel and Little Bird and my sister's three boys:


I am so proud of these! 
I got the idea from Dana over at MADE, one of my very favorite creative blogs. She does a great job of explaining the process, so I won't reinvent the wheel, but head over and check it out: HERE

They didn't require a lot of skill, but they DID require a good deal of time. (I am now an exacto knife wizard!) In the end, I love that they are so clean and sharp and look almost like they were screen printed. I can't wait to get all these kiddos at the front gates in their awesome coordinating shirts...it brings tears to my eyes just thinking about it. 

Okay, enough Disney blubbering! I will post more crafts as I make them and as I have time. I am gearing up for both our trip and the 210 BOYS who arrive in my apartments the day after (eek!) we get back from our trip. Hope you are enjoying the last breaths of summer! Already the nights are chilling and fall is creeping in....

UPDATE: 
I've had a lot of requests for the photos I used. I am not 100% sure these are the exact ones, but they are pretty close, so here's some links to the closest I could find to what I used! Hope this helps! 

Photobucket

Wednesday, June 22, 2011

Handmade Birthday!

What do you get when you combine an hour of time, some of the ugliest most fabulous costume fabrics, and a mother's fierce desire to give her daughter at least one handmade birthday present?

A pretty spectacular princess gown.

I had intended to make Squirrel a princess dress for her birthday for a while, but like so many things, kept procrastinating for any number of reasons (mostly that I couldn't find a pattern I really wanted to use). Finally, on her birthday while she was at preschool, I sat down and went to town with a whole host of crazy fabrics, courtesy of my mom. (Did you know she owned and operated a custom dance wear business all through my youth? I have access to some pretty spectacular fabric choices as a result!)

What I came up with was a quick and dirty, but oh-so-frilly princess dress for my pink/princess/fashion obsessed four year old. She loves it (pictured here with her new/matching Sleeping Beauty doll). What do you think?


Photobucket

Monday, June 20, 2011

More summer sewing

This year, I wanted to sew some of my kiddos' summer wardrobes. I made Squirrel a couple of skirts {you can see the tutorials here and here}, and made Little Bird some shorts.

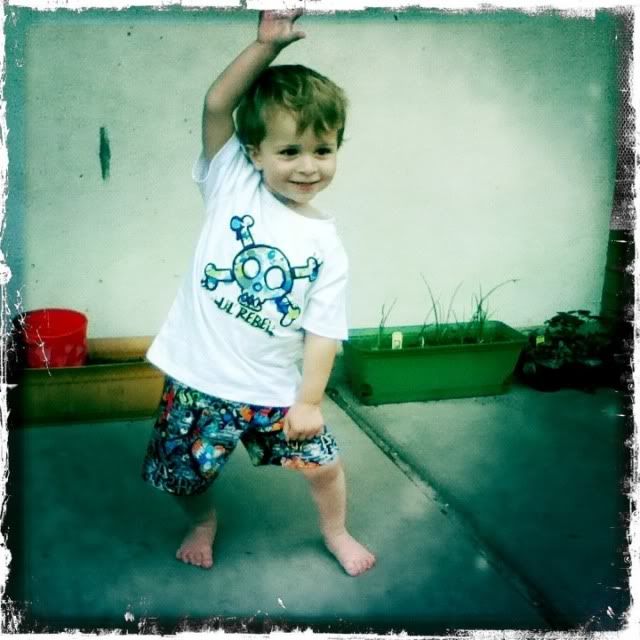
Here he is rockin' out a pair {photo on my iPod with Hipstamatic app}:
Photobucket

And running around in his "pirate pants":


I used New Look pattern 6932. I like that pattern because it: A) was inexpensive; B) has a large range of sizes (6 months to size 8); and C) has a raglan sleeve, which is just a bit more fun than a regular old tee. The directions were also super quick and easy {though most elastic pants and raglan tee patterns will be}.

The only problem with the pattern is that it is HUGE. In fact, Little Bird is wearing a 24 month or 2T size in most of his pants, but I ended up making these for him in the 6 month size because it runs so big. This is the same pattern I used for their Christmas jammies. It runs very wide and short. Any other items I have made for them, I have gone down several sizes in width, and up in length. {Of course, I have skinny, long bodied babies, so keep that in mind if you try the pattern out.} However, overall, for the price and effectiveness, this is a great workhorse pattern to use and adjust as you need.

What do you think? Are you doing any summer sewing?

And, as an aside, do you take issue with little boys wearing skulls or pirate clothing? Is it too grown up or are the connotations too negative?

Photobucket