By now, I'm sure you've heard of Pinterest, the most amazing website ever. It's essentially a digital bulletin board, where you can pin pictures of all your favorite things and still retain the original source link. The only down side is the obvious black hole for time it can become as you sift through all the beautiful eye candy.
While perusing the site, I came across this adorable outfit:
Lucky for me, I already own jeans, brown boots, AND a green knit pea coat. What I really had my eye on was that adorable striped cowl. Lucky for me, I also had some striped knit...

AND a handy workhorse tee pattern from an existing shirt, so I made myself one!
What do you think? (Photos come courtesy of Squirrel, who is quite the gifted iPod photographer...I feel like I walked right off a magazine shoot!)
(Well...a magazine shoot where the models never lost that 40lbs of baby weight from #2
...and then slouches...
while wearing horizontal stripes...)
Want one of your own? (The shirt, not the leftover baby belly!)
Lucky you!
I'll show you how!
First things first: cut your pieces out from your tee pattern.
For this shirt, I knew I only wanted a half sleeve, so I simply folded my shirt sleeve pattern under itself.
Then, right sides together, sew together the shoulder seams on your front and back pieces.
Now, take a sleeve, and by folding it half, find the middle.
(You can see below that I placed a pin there to mark it.)
Putting right sides together, line up the center of the sleeve with the shoulder seam.
Pin the shoulder of the sleeve to the curve of the front and back pieces.
Sew the seam you pinned, and then repeat for the other sleeve.
Now you are starting to have the shape of a shirt!
Next, start at the underarm seams of your shirt so the front and back line up.
Pin them and sew from the end of the sleeve to the bottom of the shirt.
At this point, if you don't want a cowl, you can hem the sleeves, neckline, and bottom of the shirt and call it quits. However, we are going for something even better!
In order to have a good loose cowl (and not a turtleneck), make sure that you have a wide and deep scoop-neck to your tee. If it isn't wide enough, take some scissors and trim out the neckline.
Once your shirt has a wide enough neck, use a tape measure to measure all the way around the neckline.
This one measured 33 inches.
Now, to cut the cowl:
Using the measurement you took around the neckline, cut a piece of fabric that is that length and very wide.
I cut a piece 33 inches long and 12 inches wide.
Here it is, folded in half "hot dog style."
Now, unfold the piece and re-fold it, "hamburger style."
Sew the two raw edges together so you have a loop of fabric.
Now fold the loop "hot dog style" again.
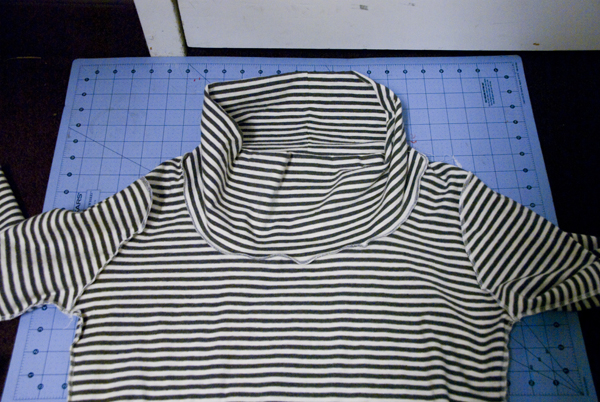
Tuck the loop, open edges up and align the seam in your loop to the back of the shirt or the shoulder seam. Pin the paw edges and the neckline of the shirt together all the way around, and then sew together.
All you have left to do is hem the sleeves and bottom of the shirt!
(And have a private photo shoot with the world's MOST adorable photographer.)
A cool new cowl to keep you just right for fall!
Enjoy!
(Here's one more of my little artist--she's diverse and enjoys modeling as well!)


Hey I already have a leftover baby belly - next to get this awesome outfit!
ReplyDeleteYou look awesome Kierra, seriously :)