Showing posts with label Tutorials. Show all posts

Friday, October 14, 2011

Tutorial: Cowl Shirt

Hi, friend!

By now, I'm sure you've heard of Pinterest, the most amazing website ever. It's essentially a digital bulletin board, where you can pin pictures of all your favorite things and still retain the original source link. The only down side is the obvious black hole for time it can become as you sift through all the beautiful eye candy.

While perusing the site, I came across this adorable outfit:

Lucky for me, I already own jeans, brown boots, AND a green knit pea coat. What I really had my eye on was that adorable striped cowl. Lucky for me, I also had some striped knit...


AND a handy workhorse tee pattern from an existing shirt, so I made myself one! 

What do you think? (Photos come courtesy of Squirrel, who is quite the gifted iPod photographer...I feel like I walked right off a magazine shoot!) 


(Well...a magazine shoot where the models never lost that 40lbs of baby weight from #2
...and then slouches...
while wearing horizontal stripes...) 


Want one of your own? (The shirt, not the leftover baby belly!)
 Lucky you! 
I'll show you how! 

First things first: cut your pieces out from your tee pattern.
For this shirt, I knew I only wanted a half sleeve, so I simply folded my shirt sleeve pattern under itself.

Then, right sides together, sew together the shoulder seams on your front and back pieces. 


Now, take a sleeve, and by folding it half, find the middle. 
(You can see below that I placed a pin there to mark it.) 


Putting right sides together, line up the center of the sleeve with the shoulder seam. 


Pin the shoulder of the sleeve to the curve of the front and back pieces. 


Sew the seam you pinned, and then repeat for the other sleeve. 
Now you are starting to have the shape of a shirt! 


Next, start at the underarm seams of your shirt so the front and back line up. 
Pin them and sew from the end of the sleeve to the bottom of the shirt. 
At this point, if you don't want a cowl, you can hem the sleeves, neckline, and bottom of the shirt and call it quits. However, we are going for something even better! 
In order to have a good loose cowl (and not a turtleneck), make sure that you have a wide and deep scoop-neck to your tee. If it isn't wide enough, take some scissors and trim out the neckline. 

Once your shirt has a wide enough neck, use a tape measure to measure all the way around the neckline. 
This one measured 33 inches. 


Now, to cut the cowl: 
Using the measurement you took around the neckline, cut a piece of fabric that is that length and very wide. 
I cut a piece 33 inches long and 12 inches wide. 
Here it is, folded in half "hot dog style."


Now, unfold the piece and re-fold it, "hamburger style."


Sew the two raw edges together so you have a loop of fabric. 


Now fold the loop "hot dog style" again. 


Tuck the loop, open edges up and align the seam in your loop to the back of the shirt or the shoulder seam. Pin the paw edges and the neckline of the shirt together all the way around, and then sew together. 


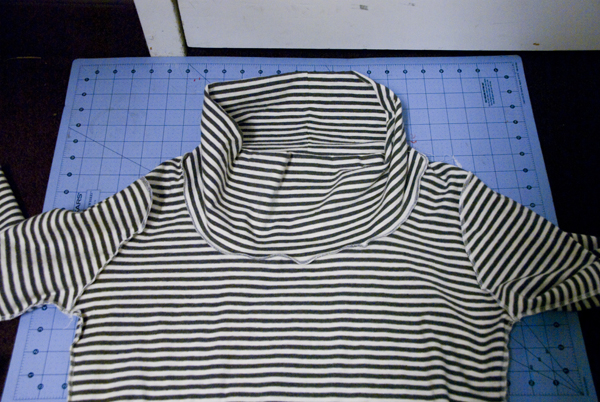
All you have left to do is hem the sleeves and bottom of the shirt!
(And have a private photo shoot with the world's MOST adorable photographer.) 

A cool new cowl to keep you just right for fall! 

Enjoy! 

(Here's one more of my little artist--she's diverse and enjoys modeling as well!)


Photobucket

Tuesday, October 11, 2011

Tutorial: Shirt Pattern from Existing Tee

Hey y'all! 
I have a couple of tutorials ready for you, but have had a hard time getting them up here. Of course, life is always busy, but lately, blogger and my internet are not getting along. C'est la vie. Hopefully, you enjoy these as I can roll them out. 

I have been working on a couple of clothing items for myself. (I always get a hankering for new clothes at the start of Spring and Fall...must be the change in weather! And when you can't afford to shop--sew!) And I thought while I was at it, I'd draw up some tutorials. 

But first, what we need is a good workhorse shirt pattern--basically, a pattern that fits well, is basic, and easily adjustable. So this tutorial focuses only an creating that pattern, a very simple process that translates easily to most basic clothing articles. 

You will need: 
a t-shirt that fits well (long-sleeved if you have one--easier to shorten sleeves than make them)
butcher paper or freezer paper (found in many grocery stores) or even newspaper
marker
straight pins

Freezer paper is great because it is very durable and relatively inexpensive. 

First, you will fold your shirt in half and lay it on top of the freezer paper. You can do this with the sleeve out, but I prefer to just tuck it under. 

Then, using a marker, trace the outline, keeping a couple of things in mind:  
*Make sure to give yourself a bit of room for a seam allowance. 
*If you are working from a t-shirt that is very thin, add a little extra width because thicker fabrics will not stretch as well. 
*Remember to add more at the bottom for a hem! 
(If you are uncomfortable with a marker this close to your favorite t-shirt, you can use the pin prick method mentioned below!) 


You can see in the photo above that I added quite a bit of length to this shirt. 
Partly, this is because this shirt hits me just above where I'd like it to, 
and partly because I knew what I was making would be a bit longer. 


Repeat the tracing with the other side. When you are done, you should have a front and a back piece. (The front should be cut lower than the back). Label the side that you will need the fold to be on, and label each piece as "Front" or "Back."
Here's my two pieces, front and back. (Sorry for the lack of contrast--I'm a night crafter!) 

Next, we are on to the sleeve. Much like the bodice, you will lay the sleeve out flat. 

Now, as you can see, you can't just use a marker to trace the inner seam of the sleeve, so one way to do this is by using straight pins. 

Simply use your straight pin to poke through the freezer paper along the seam, as demonstrated with the yellow dots in the next photo. 

Then, remove the sleeve, and connect the dots with a gently curving line...


And you'll have a whole sleeve and a finished pattern! 


These are the three basic pieces for a shirt pattern, and there are only a few seams before your shirt is completed!

More tomorrow on the first project (so long as blogger cooperates).

See you then!

Photobucket

Monday, October 3, 2011

Tutorial: Fleece Ear Warmer Headband

As I mentioned a few days ago, I started running back in April. The spring and summer months in Idaho are great for running. But as fall's chill has begun to creep in, I have realized I need some new gear to run in. The other night, I realized the first thing to get cold (and NOT warm up once I got going) was my ears! So I decided to make a fleece head band to keep them warm. And while I was at it, I made a tutorial.

I have a penchant for leopard print, so lucky for me, I had some leopard print fleece already on hand. The piece was pretty small, a leftover from Little Bird's awesome Halloween costume from last year. But, the piece doesn't need to be very large.


With my cutting mat, rotary cutter, and quilting square, I cut two layers of fabric about 4 1/2 inches wide by 24 inches long. (If I were to do this again, I would probably have thinned it just a bit.)


Then, I wrapped the strips around my head to fit and ended up cutting about 2 inches off. 
Next, taper the ends so it will stay put on the back of your head a little better. 


Once you have it tapered the right amount, go ahead and sew the pieces together all the way around, leaving a small opening to turn the headband. 


I left my opening at the end, but you can leave it anywhere. Just make sure you have enough space to turn the headband right-side-out through the hole. 


Once you have turned it right-side-out, use a straight stitch to top-stitch the headband. 


Next, using a tight zog-zag stitch or your machine's button hole maker, create a button hole. 
(This was my first ever button hole! Not too shabby, if I do say so myself.)
After you have made the button hole, cut the space in the middle of the stitch. 


Now, for a bit of embellishment. I just randomly cut out a few flower shapes to layer, and an irregular strip for added texture. 


I layered the flowers on top, and ruffled the strip. 
Using thread and needle, apply the embellishments and the button on the 
opposite tail from the button hole. 

Aaannnddd...
You're done! And if you have longer hair than me (so not hard), 
you probably won't look as crazy, like you put your finger in a light socket. 

Here's the thing about making stuff for yourself...
then you have to be the model. 
I don't post a lot of photos of myself because I think they're cheesy...and well, never look right...


Do I smile?

Act too cool for school?

Something in between?


Give up and make ridiculous faces like this?


Or go back to the beginning and hide like usual? 
(I think this is the one I like best. )


Anyway, enjoy your headband! I've already tested it out and it does indeed keep my ears cozy and warm! Now I may be able to run outside all winter long...


Photobucket

Wednesday, May 18, 2011

{Yes...Another Skirt Tutorial}

Here's another little skirt I made for Squirrel. This tutorial is for a peasant style skirt, once again made from those fabulous little fat quarters! (I love fat quarters...they let me feed my fabric addiction without too much guilt. They are cheap, don't take up much space, and there's none of that hemming and hawing at the cut table, trying to decide how much yardage I "need." Just a cute little package ready to play with. Like snack-sized fabrics!)

This tutorial will create a three-tiered skirt. Again, Squirrel wears about a size 3T or 4T, but this can easily be adjusted for bigger or smaller ladies. In fact, the same basic idea should work for adults too, and one of these days, if I can actually nail down the fabrics I want, I will make myself one too.


For the three tiers, you can use the same fabric, two alternating fabrics, or three completely different fabrics. For this size, you will need a fat quarter for each tier. I chose two fat quarters in a rose print, and one in a coordinating green-on-green floral.


Start by using the center fold, lengthwise, to cut the fat quarters in half.
If you are making the skirt for a shorter kiddo, this is also a good place to cut off some of the width. I cut about 3 inches from each set after I cut them in half. (Though admittedly, if you just cut 3 inches off the end with the fold, you could save yourself some quality time with the scissors.)

Next, sew the sides of one short end of each set of halved fat quarters (with the right side of the fabric facing inward...somehow, every time I make one of these skirts, I get at least one set backwards).

Essentially, you are making strips that are now twice as long, with a seam down the middle. 


Then, cut two of the sets down on their open ends. Leaving one set at the original length, I cut the next set down three inches, and the third set down to three inches less than the middle set. 


Now adjust your stitch length and tension so that we can get some gathering happening. 
You want a long straight stitch, probably as long as your machine will make. 


And you want to turn the tension up as well. 


These two things combined will cause your fabric to gather. 
Leave your shortest strip alone, but then stitch along the one side of your other two strips. 
This gathering will help you match up the lengths as you put your tiers together. 


After you have gathered the fabrics, you need to work with it to get the tiers to match up. 
Pin the seams together, and then slide the fabric on either side of it along the thread to get the length right. The long stitch should make it easy to move the gathers back and forth. 


Once you've got it matched up, sew the gathered tier to the straight edge of the tier above it. 
Repeat this for the next tier as well. 


This should leave you with three layers, with each longer tier nicely gathered. 
Sew up the seam on the opposite side of the skirt now. 
You're almost done! 


Cut a piece of elastic about 2 inches shorter than the waist measurement of your recipient, and stitch it to the waist. (I used the serger, but you can also use a zig-zag stitch.)


Create a rolled hem by folding the edge under about 1/2 inch, and then folding it another 1/2 inch again. 
Use a straight stitch (don't forget to fix the tension and bring that stitch length back down!) to hem close to the edge of the fold. 


Roll down the waistband elastic in the same way, and finish off with a nice long zig-zag stitch. 


Easy peasy! You're done! 


Now for the hard part--catching your model in it before she takes off! 


Enjoy!

Photobucket

Tip Junkie handmade projects